|
I've been wanting to join a CSA for a long time. If you haven't heard of a CSA, it's an organized effort to provide locally grown food to a small group of subscribers. Typically, you pay a flat fee to join, and every week, you get a portion of whatever is being harvested that week. At our last property, I had room for a sizable veggie and flower garden, so didn't bother - we were able to grow a lot of our own food through the summer. At our new location, there isn't a lot of gardening space. Also, a career transition has taken me away from teaching, which lent itself to being a much more attentive gardener, with lots of summer hours to keep things weeded and flowering. This year it finally felt like the right time to get set up with a subscription to our local CSA at Charmingfare Farm. This particular CSA offers 20 weeks of whatever is growing and available each week, starting at the end of May. After a long New Hampshire winter, I anticipated the first day like a little kid waiting for Christmas. Every week feels like that - though I imagine the fun will wear off after a few more weeks. May in New Hampshire doesn't typically present with bumper crops of anything, except rain, so my expectations were low. I was pleasantly surprised to leave with a plethora of green things, freshly harvested. Fiddleheads, asparagus, a variety of fresh herbs, and chives were all available this first week. I used every bit of it. Read below for recipes. 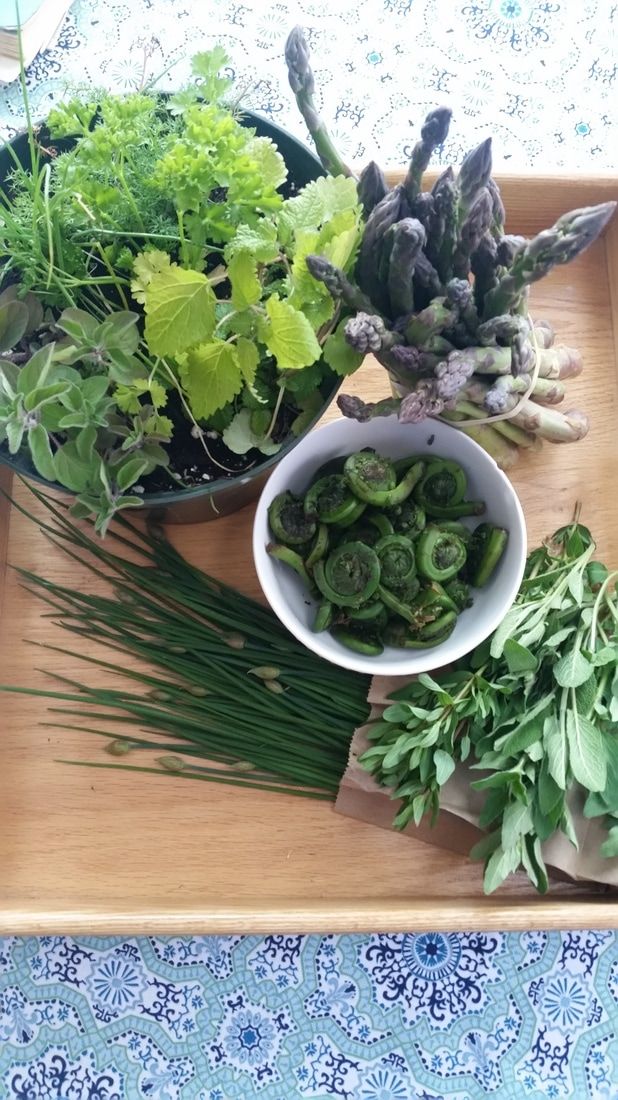 Sauteed Fiddleheads with Chives
To prepare fiddleheads, soak briefly in a bowl of cold water to remove dirt. Drop into boiling water for 3 minutes. Strain. Now they are ready to cook. I heated up a few tablespoons of olive oil and butter in a skillet, along with fresh garlic and chives. I added the fiddleheads and sauteed for about 5 minutes. Ready to serve! Oven-Roasted Asparagus Preheat over to 450 degrees. Cut the ends (about 1/2 inch) off of the stalks. For thin spears, leave whole. For thicker spears, slice in half the long way. Lay on a cookie sheet, drizzle with olive oil, and add a sprinkle of salt. Roast in the oven for 10-15 minutes, or until fork tender. Balsamic and Fresh Herb Marinade Mix 1/2 cup olive oil, 1 cup balsamic vinegar, 1 Tbsp sugar, 1 tsp salt, fresh ground pepper, and several tablespoons of fresh chopped herbs. I had oregano, marjoram, and basil on hand this week. This marinade works great with chicken or beef. Allow meat to sit in marinade for at least one hour, preferably overnight.
0 Comments
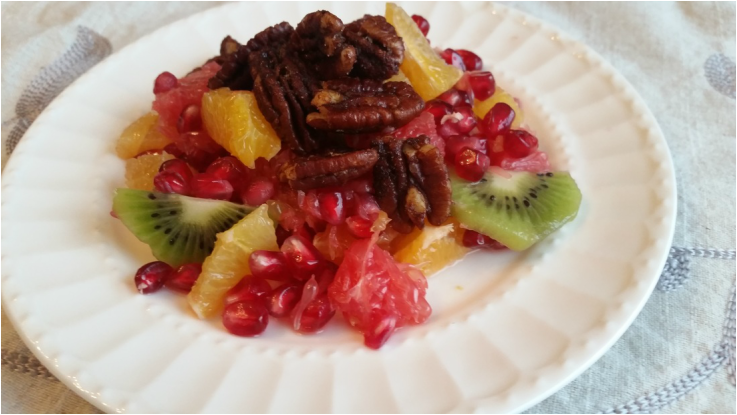 For a Thanksgiving dessert this year, I decided to bring a fruit salad, inspired mainly by the pomegranate that is becoming available in the grocery stores right now. Coupled with some Florida citrus and kiwi, the colors and flavors combine to make a tart yet sweet, jewel-y treat. Additionally, I've been craving gingerbread so I made a batch of gingerbread-inspired pecans to top the fruit salad. A few words about pomegranate: I tried this fruit for the first time while living in Turkey, where it is quite ubiquitous. It is available in markets, juiced for drinking, added to desserts, and used to make a type of sour sauce that is sometimes used in the way that one might use vinegar. My neighbor showed me how to open one and pull out the seeds, and I grew to love this delicious tart fruit. The seeds are beautiful - they look like rubies - and delicious - they pop with juice when you bite into them. I eat them by the spoonful, or mixed with plain yogurt. I still make a holy mess when I cut into one and pull the seeds out, but it's well worth it. Toasted Gingerbread Pecans 2 cups pecans 1 Tbsp sugar 2 tsp cinnamon 1/2 tsp nutmeg 1/2 tsp powdered ginger 2 Tbsp olive oil 1 Tbsp maple syrup Toss all ingredients in a large bowl. Once well combined, dump onto a cookie sheet lined with parchment. Bake at 400 degrees, stirring every 10 minutes twice for the first 20 minutes, and then every 5 minutes after. For the fruit salad, I combined several cups of peeled and sliced oranges, red and white grapefruit, kiwi, and the seeds from two pomegranates. Top the fruit salad with the nuts right before serving. 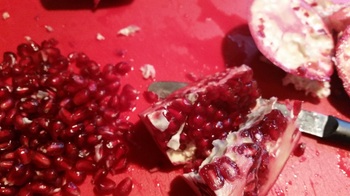 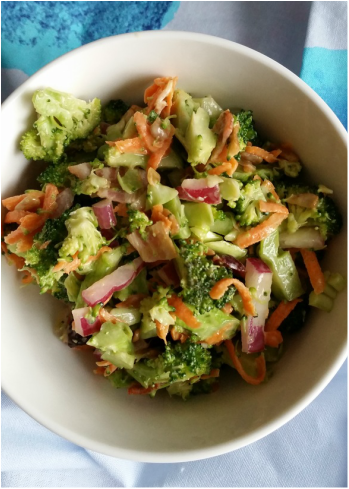 This is a paleo-friendly makeover of a summer potluck classic. I first had this over a decade ago when my good friend made this for a cookout, but in its classic form. Old school style involves broccoli, bacon, shredded cheddar, raisins, sunflower seeds, and a slightly sweet and tangy coleslaw-type dressing. I overhauled the recipe just a bit for a gathering we hosted on the fourth of July, taking the cheese out to keep it dairy-free, cutting down on the sugar in the dressing, and adding grated carrots for extra crunch and color. I made a huge bowl and it was gone by the end of the night. It was such a hit with my own family that I actually made another big batch this morning. This is the type of salad that can keep for a few days, and actually tastes better after the flavors have had an opportunity to meld as it chills.
One important piece: chop things very, very small. It tastes better. I don't know why - something about surface area and being able to get more little bits of different things into one bite. Ideally the dressing would be made with paleo-friendly mayo - either homemade or purchased. I used conventional because I have never mastered the art of mayo making. I would love to get good at it, but I have wasted many high quality products trying a few times and, sadly, have given up that fight. But I would imagine any number of alternatives would work fine in the recipe, even skipping mayo altogether, though it lends a creaminess I really like. Ingredients 4 cups of well-chopped broccoli 1/2 cup chopped red onion 1 cup grated carrots 1/3 cup dried cranberries 1/2 cup sunflower seeds For the dressing, combine the following in a separate bowl: 1/2 cup mayonnaise 1/4 cup olive oil 1/4 cup white vinegar 2 Tbsp sugar 1/2 tsp salt Mix veggies and dressing in a large bowl. Toss well to combine. Refrigerate for at least 4 hours before serving. Will remain delicious for about 1 week in the fridge. 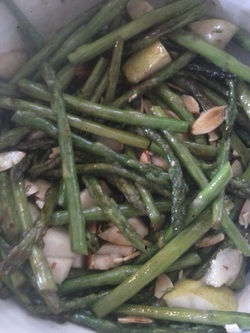 Ingredients
1 bunch of fresh asparagus, trimmed and cut into 4" stalks Olive oil 1 fresh pear, diced 1/4 cup slivered almonds Salt and pepper Balsamic vinegar 1. Cook asparagus in a well-oiled skillet over medium-high heat for about 5 minutes, stirring occasionally. Remove from heat and allow to cool. 2. When cool, add pear, almonds, salt and pepper to taste, 3 Tbsp balsamic vinegar, and 1 Tbsp olive oil. Toss and serve, cold or at room temperature. One of my favorite things to order out is a Greek salad from Panera. They are delicious. Really. But not really worth $8.95, either. I have started making Greek salads for myself, and bringing them to work for lunch. I have found that the key to a great salad (any type) is to have lots of different ingredients, and chop everything up nice and small. So, that's what I do with all of the following ingredients, except for the olives and the banana peppers. Toss it all with the dressing, and it's WAY better than the Panera salad, hands down. Cheaper and organic, if you buy organic produce.
In terms of quantities, I find that I like a high ratio of lettuce to other stuff, meaning that I have an equivalent amount, probably, if you were to measure (which I don't) of lettuce to everything else chopped up. But that, of course, is completely customizable according to your preferences. Mixed baby greens Red onion Cucumber Red pepper Grape tomatoes Feta cheese Fresh Kalamata olives Banana peppers (I buy the rings in the pickle aisle) Dressing: Juice of one lemon, mixed with 1/4 cup of olive oil, a pinch of salt, a pinch of sugar, and a teaspoon of oregano. Whisk together and use liberally. Ideally, I take the time to grill or saute some chicken breast on Sunday, which I reserve to put on my Greek salads throughout the week. But this is also great as a stand-alone.  I am so thankful to one of my husband's cousins for introducing me to this recipe. She made and served these one evening when we were at her house, and they have become a weekly staple at ours. These take an hour - a full hour - to be perfect, so plan ahead. I like to get them ready right when I walk in the door from work and start them baking. Sometimes they are a side dish, others they are the main dish. One son has topped them with chili and cheese, for instance. Sometimes I'll just have these for dinner and not much else.
This is a simple, low-maintenance recipe. The fries are crunchy enough that you can pick them up and dip them into ketchup. They brown up because you add a little bit of sugar when you are preparing them. They scratch the itch for fries, without needing a deep fryer or using oils heated to high temperatures. They don't require stirring or any other type of maintenance - once you put them in the oven, it's just a matter of waiting an hour until they're done. Ingredients 4 Russet potatoes, cut into fries. I like them to be about 1/2 inch thick. 4 Tbsp olive oil 1 tsp salt 2 tsp sugar Preheat oven to 400 degrees. Cut potatoes, and place them into a large bowl. Add remaining ingredients and toss until potatoes are coated. Spread evenly on a baking sheet. Put in oven for 1 hour. Don't stir or disturb in any other way. After 1 hour, remove from oven and allow them to cool for 5 minutes. Serve. *I recommend putting the potatoes on parchment paper on the cookie sheet. Don't make the mistake I made once of putting them on wax paper...you can imagine. Brilliant. * I eat a lot of vegetables, and have found it is possible, every once in a while, to develop salad fatigue. I can only eat so many salads in a week and not get just a tad bit bored with them. Sure, I can mix it up with different toppings and dressings, but sometimes, a salad is just a salad, and I don't want to see another one for a few days. Also, depending on what's for dinner, I can get to the point where I don't want to be bothered with the making of the salad. Washing and drying leaves, tearing, chopping, making a fresh batch of dressing because we're almost out...
I have found that many vegetables get along very well with the oven. Throw a mixture of veggies cut into big chunks on a baking sheet, coat with some olive oil, and back at 400 degrees for 15-45 minutes (depending on the veggies you choose), and you end up with a delicious medley of tastes and textures. Roasting brings out the natural sweetness in many vegetables. And you don't lose a ton of nutrients to the water, like you can with boiling. Oven-roasted veggies can be served as a side dish or a main dish. Sometimes, having the vegetables, maybe drizzled with plain yogurt, is enough. Sometimes, they make a nice accompaniment to a main dish. I cut all of the vegetables into bite-sized chunks and put on a baking sheet. Then I (liberally) pour olive oil over them, and use a spatula to stir in order to thoroughly coat them. I sprinkle them with some salt and pepper, and throw them into a preheated 400 degree oven. Below are my favorites for oven roasting, listed in order from least amount of cooking time to longer amount of cooking time, with the lower end of cooking time being 20 minutes and the longer end being 45 minutes. You may need to do some well-timed veggie choreography as they cook - remove the onions and cabbage to a platter while the yams and potatoes finish cooking, for instance. These vegetables reheat well as needed, and can also be thrown together with some broth and pureed to make a creamy vegetable soup. For cabbage and cauliflower, try cutting it into slices, or "steaks". Onions Bell peppers Zucchini Green cabbage Red cabbage Cauliflower Eggplant Yams Butternut squash Turnips Beets Carrots Potatoes One of the perks to using the crock pot for butter chicken is that it frees up time and space on the stove to make an accompanying curry. This is one of my favorites - simple and crunchy.
In a large skillet, heat: ~2 Tbsp oil 1 tsp mustard seeds 1 tsp cumin 1 tsp garlic 1 tsp curry powder Fry until seeds start popping and spices become aromatic. Then add: 1 cup onion. Saute. Then add: 1 cabbage, cut into long, thin strips 2 tsp coconut powder (if you have it - have made it without and it's fine) 1/2 tsp salt 1/2 tsp turmeric Mix together. Cover, turn down heat to medium-low, and cook until cabbage is soft. One of my goals this school year is to foster a greater love of vegetables in my kids. They eat fruit of all types, but in terms of veggies, it's limited to carrots, cukes, the occasional green salad, and sweet peppers. (I don't count corn, potatoes, or ketchup as vegetables!) I am hoping that by preparing different curries and sautes with flavorful sauces, or by dousing them in grass-fed butter, I can inspire the boys to try more variety. It's good for the adults, too, as we get bored with salads and the usual fare.
To kick off my efforts, I created this hybrid recipe last night. We have been on a bit of a Thai jag in the family lately, and I'm thrilled to discover that my kids both enjoy Thai cuisine. Sadly, I have a ways to go in terms of learning how to cook it at home in such a way that it is as tasty as it would be in a restaurant. I made Pad Thai a few nights ago, and as a side dish, made a simple salad (lettuce, tomatoes, cucumbers, and onions) and a Thai-inspired dressing from the Moosewood Cookbook. The original recipe is made from peanut butter, but it can easily be made from other nut butters if you are strictly primal and avoiding legumes. Looking in the pantry and fridge last night, I discovered baby greens and sweet potatoes and decided to create a saute. Once done, I pulled out the nutty dressing and drizzled it over the whole mess. I also ate some oven roasted red cabbage on the side. Delicious, veggie-ful, and satisfying. In terms of what the kids thought, one ate the saute with no sauce and tolerated it, while the other would only try the roasted red cabbage, which was also tolerated. No love, but tolerance is a step in the right direction. The adults thoroughly enjoyed all of the above. Saute: 1 onion, sliced thin 2 cloves garlic, minced 1 sweet potato, peeled and diced 4 cups fresh greens (I used baby greens) salt and pepper to taste Plenty of fat for cooking - I used olive oil, 4-6 Tbsp 1. Put fat in pan and heat over medium heat. Add onions and garlic. Saute for about 5 minutes, or until onions are soft. 2. Add sweet potatoes. Allow to cook for about 10 minutes, stirring occasionally. Both the onions and sweet potatoes will caramelize nicely, but stirring is important to prevent burning. 3. At this point, if the pan looks dry, add 1/4 cup of water and stir. This will de-glaze the pan and provide moisture for steaming the greens. Add the greens and cook 2-3 minutes or until soft. Season with salt and pepper. Nut Dressing: (Taken from The Moosewood Cookbook by Mollie Katzen, with a few tweaks) 6 Tbsp nut butter 3/4 cup boiling or very hot water 1/2 tsp salt 2 tsp sugar or honey pinch of cayenne 1-2 cloves garlic, minced 2 Tbsp rice vinegar 2 Tbsp oil 1. Dissolve the peanut butter in hot water. Stir until fully combined. 2. Add rest of ingredients. Stir well. Allow to chill, then serve. Mexican food seems to be one of my favorite ethnic foods category to massacre. I know that most of what I make is nowhere near authentic, but it's so fun to experiment. It seems to be a family of food that no one in our family tires of, and it lends itself so nicely to using fresh ingredients. I developed this recipe after eating at a Mexican restaurant and noticing how much everyone enjoyed the shredded chicken tacos. The key is long, slow cooking to get the chicken to the point of shred-ability. During the longer cooking period, there is ample time for the chicken to absorb the taste of the spices and herbs. I might try in the future with a splash of lime juice and some fresh cilantro added to the mix.
I also tried to make refried beans that tasted a little more like the restaurant version. I have found that the secret to this is using a food processor (or a VitaMix in my case) to make a nice, fine puree. That recipe is also below. The shredded chicken could easily be prepared in a crock pot using the recipe below. I would just put everything directly into the crock pot raw, cook at a low setting for 6-8 hours or a high setting for 3-4 hours. Shredded Chicken Tacos Ingredients: 1/2 onion, chopped 3-4 cloves garlic, minced 1 tsp salt 1 tsp cumin 1 tsp paprika or chili powder black pepper 1/4 cup chopped green chilies, if desired 2-4 Tbsp olive oil 4 chicken breast halves 1 can diced tomatoes with juice OR 2 cups chopped fresh tomatoes 3/4 cup water or chicken broth 1. Heat oil in a deep skillet over medium heat. Add onions and garlic and saute for 5-10 minutes. 2. Add all spices and cook until aromatic. 3. Add chicken breasts, whole. Cook until slightly browned on both sides. 4. Add tomatoes, green chilies, and water. Turn down heat. Cover and simmer over low heat for 1-2 hours. 5. Shred the chicken with a fork and knife. It should fall apart very easily at this point. Serve on a bed of fresh greens with all of the normal taco fixin's - sour cream, shredded cheese, salsa, guacamole - whatever you like. Also delicious ladled over rice. I served this with crunchy corn tortillas for the family. Restaurant-Style Refried Beans 2 cans of beans - I like to use a combination of 1 can of pinto and a 2nd can of either black or kidney 2 Tbsp olive oil 1/4 cup water 1/2 tsp onion powder 1/2 tsp salt 1/2 tsp garlic, minced or powder 1. Put all ingredients into a food processor or blender. Run until smooth. If needed, add another 1/4 cup of water. The beans will look runny at this point, but you will cook off the extra moisture in the next step, at which point they will thicken up. 2. Put in a sauce pan and heat over low heat for 15 minutes, stirring often, until hot. |
AuthorI'm Emily. I currently work in online education management, but I also have a Masters degree in Nutritional Sciences (my true passion). In addition, I am a mom, cook, avid reader, novice gardener, and enjoy all kinds of outdoor activities. On my blog, you will find articles on food, fitness, weight management, and eating issues. ALL recipes on my blog are gluten-free. Many are low-carbohydrate. Most are grain free. Enjoy! 
Categories
All
Archives
June 2019
|
